Basic Drawing with Adobe Illustrator's Paths & Pen tool
Illustrator Paths & Pen Tool Attributes
In Adobe Illustrator CS, drawing line-art can best be done via the Illustrator Pen tool (P). The Pen tool is one of the most useful tools in the Illustrator tool pallet, but it can also be one of the most frustrating tools to master for the Illustrator newcomer. Once you become comfortable with this powerful tool you will rarely use the Line tool again.
The Illustrator Pen tool can create straight lines (paths) by clicking point to point or by constraining its movement with the shift key. It can also create graceful bends, curves, and other PostScript shapes that are referred to as Bézier Curves (named after French mathematician and engineer Pierre Bézier).
The Illustrator Pen tool has four attributes (A, B, C, and D shown in Fig. 1). The main Pen tool A is the tool that you will use most of the time. The "Plus" Pen tool B is used to add new anchor points to a path or stroke. The "Minus" Pen tool C is used to remove existing anchor points from a path or stroke. Tools B and C are almost useless because you can easily access their features via keyboard commands while in the Pen tool A mode. Pen tool D can change a hard corner anchor point into a Bézier curve anchor point as well as change a Bézier curve anchor point back to a hard corner point.
The Illustrator Pen tool's "Fill" and "Stroke" features are accessed in the "Tool" pallet (Fig. 2). The term "Stroke" or refers to the actual line that the Pen creates with the "Path". The term "Fill" denotes the background color that will fill in the area within any shape that you create. When creating line-art for technical illustration you would generally leave the "fill" area empty (as shown in Fig. 2 - white box with diagonal red line). In our Fig. 2 sample we are showing the "stroke" color as solid black.
The Pen tool's line thickness (or stroke weight) is controlled by the "Stroke" pallet shown in Fig. 3 (see the Controlling Line Weights Tutorial).

Drawing Paths with the Pen Tool
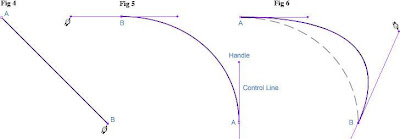
Using Illustrator's Pen tool to create a straight line is as easy as clicking from point A to point B (Fig. 4). To constrain the line to a horizantal, vertical, or 45º diagonal line you would hold the shift key while you click point B. You will notice that the active anchor point is a solid box (point B) and the inactive anchor point (A) is an empty box.
To create the arc path shown in (Fig. 5) you would click and drag point A upward while holding the shift key to constrain the motion vertically. This will create a "Control Line" with a Control Handle". Next you will click point B dragging the Control Handle to the left. Holding the shift key will constrain the dragging motion in a horizontal plane.
Now we will distort the arc's path (Fig. 6) by clicking on one of the Control Handles and dragging it toward the upper-right. The active anchor point (B) is solid and the inactive anchor point (A) is an empty box. When you release your dragging motion the new shape will appear.
Technical Note: If the stoke or path is not active you can re-activate it while in the Pen tool mode by holding the Command key while clicking anywhere along the stroke.
We will now add a third anchor point (C) to our diagonal line path in Fig. 7. By clicking this cursor along the path you will create a new anchor point. When we add a third anchor point to Fig. 8 you will see Control Lines and Handles appear (D). These new Control Lines and Handles assume the correct positioning to follow our arc as it was before this addition. Now we will drag Control Handle D downward and to the left Fig. 8. The Control Handle acts like a magnet, pulling the arc in the same direction as your dragging motion.
Technical Note: When you position the cursor over an active path while in the Pen mode a "plus" sign will appear next to the cursor. When you position the cursor over an existing anchor point while in the Pen mode, a "minus" sign will appear next to the cursor. If you click on the existing anchor point it will remove it from the path.
Conclusion
This is a very basic lesson in the use of the Illustrator Pen tool and its ability to create shapes and curves. Using the techniques discussed in this tutorial there is no limit to the complexity of the shapes you can create with Illustrator Paths. In future tutorials we will explore the multitude of keyboard commands that control Pen Tool behavior as well as attempting to trace very complex subject matter.


0 comments:
Post a Comment